

PRTG Manual: Add a Group
Note: This documentation refers to the PRTG System Administrator user accessing the Ajax interface on a master node. For other user accounts, interfaces, or nodes, not all of the options might be available as described. When using a cluster installation, failover nodes are read-only by default.
To manually add a group, select Devices | Add Group from the main menu. An assistant will appear, leading you through two steps. For faster setup, you can select Add Group... in the context menu of a probe or group to which you want to add the new group. This will skip step 1 and lead you directly to step 2.
- Step 1
Please choose a probe or group you want to add the new group to. Click on Continue.
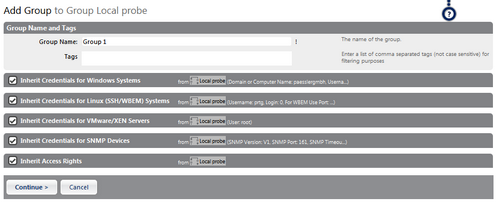
Add Group Assistant Step 2
- Step 2
Add group settings as described below.
Group Name and Tags |
|
Group Name |
Enter a meaningful name to identify the group. The name will be shown by default in the devices tree and in all alarms. |
Tags |
Enter one or more tags, separated by space or comma. You can use tags to group objects and use tag-filtered views later on. Tags are not case sensitive. We recommend using the default value. You can add additional tags to it, if you like. Tags are automatically inherited. |
Credentials for Windows Systems |
|
Domain or Computer Name |
Define the authority for Windows access. This is used for Windows Management Instrumentation (WMI) and other sensors. If using a Windows local user account, please enter the computer name here. If using a Windows domain user account, please enter the domain name here. |
Username |
Enter the username for Windows access. Usually, you will use credentials with administrator privileges. |
Password |
Enter the password for Windows access. Usually, you will use credentials with administrator privileges. |
Credentials for Linux (SSH/WBEM) Systems |
|
Username |
Enter a login name for the Linux access via SSH and WBEM. Usually, you will use credentials with administrator privileges. |
Login |
Define which authentication method will be used for login. Choose between:
|
Password |
This field is only visible if password login is selected above. Enter a password for the Linux access via SSH and WBEM. Usually, you will use credentials with administrator privileges. |
Private Key |
This field is only visible if private key login is selected above. Paste a private key into the field (OpenSSH format, unencrypted). Usually, you will use credentials with administrator privileges. Note: If you do not insert a private key for the first time, but change the private key, you need to restart your PRTG core server service in order for the private key change to take effect! For details, please see Monitoring via SSH. |
For WBEM Use Protocol |
Define the protocol that will be used for WBEM. This setting is only relevant when using WBEM sensors. Choose between:
|
For WBEM Use Port |
Define the port that will be used for WBEM. This setting is only relevant when using WBEM sensors. Choose between:
|
WBEM Port |
This setting is only visible if manual port selection is enabled above. Enter the WBEM port number. |
Credentials for VMware/XEN Servers |
|
User |
Enter a login name for access to VMware and XEN servers. Usually, you will use credentials with administrator privileges. |
Password |
Enter a password for access to VMware and XEN servers. Usually, you will use credentials with administrator privileges. |
VMware Protocol |
Choose between:
|
Credentials for SNMP Devices |
|
SNMP Version |
Select the SNMP version that will be used for device connection. Choose between:
Note for SNMP v3: Due to internal limitations you can only monitor a limited number of sensors per second using SNMP v3. The limit is somewhere between 1 and 50 sensors per second (depending on the SNMP latency of your network). This means that using an interval of 60 seconds you are limited to between 60 and 3000 SNMP v3 sensors for each probe. If you experience an increased "Interval Delay" or "Open Requests" reading of the probe health sensor you need to distribute the load over multiple probes. SNMP v1 and v2 do not have this limitation. |
Community String |
This setting is only visible if SNMP version v1 or v2c are enabled above. Enter the community string of your devices. This is a kind of "clear-text password" used for simple authentication. We recommend using the default value. |
Authentication Type |
This setting is only visible if SNMP version v3 is enabled above. Choose between:
Your device must be set to the same value. |
User |
This setting is only visible if SNMP version v3 is enabled above. Enter a username for secure authentication. Your device must be set to the same value. |
Password |
This setting is only visible if SNMP version v3 is enabled above. Enter a password for secure authentication. Your device must be set to the same value. |
Data Encryption Key (DES) |
This setting is only visible if SNMP version v3 is enabled above. Enter a Data Encryption Standard (DES) key here. If you provide a key in this field, SNMP data packets will be enrypted using the DES encryption algorithm, providing increased security. Your device must be set to the same value. Note: If the key entered in this field does not match the key configured in the target SNMP device you will not get an error message! Please enter a string or leave the field empty. |
SNMP Port |
Enter the port used for SNMP communication. We recommend using the default value. |
SNMP Timeout (sec.) |
Enter a timeout in seconds for the request. If the reply takes longer than this value the request is aborted and an error message is triggered. |
Click on the Continue button to store your settings. If you change tabs or use the main menu, all changes to the settings will be lost!
Ajax Web Interface—Device and Sensor Setup—Topics
Other Ajax Web Interface Sections
Related Topics |
Keywords: Add,Add Group,Group,Group add