

PRTG Manual: SNMP Library Sensor
The SNMP Library sensor monitors a device using Simple Network Management Protocol (SNMP) in combination with a compiled Management Information Base (MIB) library file. This provides extended monitoring beyond other the SNMP sensors of PRTG.
In order to monitor any SNMP capable device, you can download the manufacturer's MIB files for these devices, convert them to the Paessler oidlib format and import them into PRTG. To make your monitoring setup as convienient as possible, PRTG is delivered with pre-compiled oidlib library files that already contain the Object Identifier (OID) of SNMP counters for the most common devices in a network.
For a general introduction to the technology behind SNMP, please see Monitoring via SNMP section.
Manually add a new sensor to an SNMP device and from the Add Sensor dialog, select SNMP Library sensor. PRTG will show a list of oidlib files available on the system. This contains all library files stored at the \snmplibs sub-directory of your PRTG installation directory—both the ones delivered with PRTG and your own files. For details about directory paths, please see Data Storage.
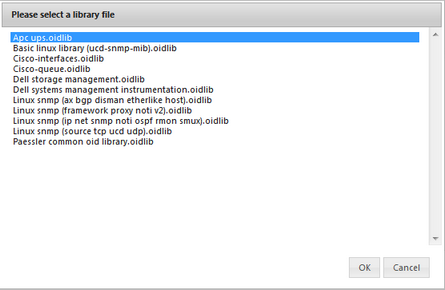
List of SNMP Default Library Files
The file names in the list indicate the potential purpose. Select a name that appears appropriate for your device and confirm with the OK button. Often, Paessler common oid library.oidlib is a good start. If the file does not fit to your device, this will result in an error message saying that no available interfaces were found on this device. If you see this message, please hit the Go back and retry button and try with another file. If counters were found for your device, you will see the sensor's settings.
The following files are delivered with PRTG and allow to extend your SNMP monitoring for many devices. Please be aware that not all devices and/or parameters may be supported by the libraries.
- APC UPS.oidlib
Can be used to monitor uninterruptible power supplies (UPS) from APC American Power Conversion Corp. - Basic Linux Library (UCD-SNMP-MIB).oidlib
Can be used to monitor basic system parameters on Linux systems, such as memory, disk and swap, CPU, etc. - cisco-interfaces.oidlib
Can be used to monitor Cisco specific parameters. - cisco-queue.oidlib
Can be used to monitor Cisco specific parameters. - Dell Storage Management.oidlib
Can be used to monitor Dell storage devices. Possible parameters include disk arrays, battery and power supply, fan and temperature, virtual disk, etc. - Dell Systems Management Instrumentation.oidlib
Can be used to monitor the hardware of Dell systems. Possible parameters include ACPower and battery, alerts, base board, Bios, BMC, chassis, COO, cooling, event log, firmware, IDE, keyboard, memory, port, network, processor, SCSI, system, temperature, USB, UUID, etc. - Linux SNMP (AX BGP DisMan EtherLike Host).oidlib
Can be used to monitor different aspects of Linux systems. Note: This file can find a very large number of possible interfaces. It may take a few seconds until the selection table is shown. - Linux SNMP (Framework Proxy Noti v2).oidlib
Can be used to monitor different aspects of Linux systems. Note: This file can find a very large number of possible interfaces. It may take a few seconds until the selection table is shown. - Linux SNMP (IP Net SNMP Noti OSPF RMON SMUX).oidlib
Can be used to monitor different aspects of Linux systems. Note: This file can find a very large number of possible interfaces. It may take a few seconds until the selection table is shown. - Linux SNMP (Source TCP UCD UDP).oidlib
Can be used to monitor different aspects of Linux systems. Note: This file can find a very large number of possible interfaces. It may take a few seconds until the selection table is shown. - Paessler Common OID Library.oidlib
Can be used to monitor many common hardware devices.
Additionally you can create your own oidlib files by importing your device manufacturers' MIB files, using a the free Paessler MIB Importer. Simply convert your mib files and save the resulting oidlib files to the \snmplibs sub-folder of your PRTG program directory. For details about directory paths, please see Data Storage. For more information and download of MIB Importer, please see the link in the More section below.
SNMP Library Sensor—Add Sensor Settings
The following settings for this sensor differ in the 'Add Sensor' dialog in comparison to the sensor's settings page:
SNMP Library Specific |
|
Library |
This shows the path to the oidlib file selected before. Once a sensor is created this value cannot be changed. It is shown for reference purposes only. If you need to change this, please add the sensor anew. |
Library-OIDs |
Select the aspects of the device you want to monitor. A list specific to your setup is shown. It contains all counters found in the chosen library that match your device. Select one or more items by adding a check mark in front of the respective line. For each selection one sensor will be created when you click the Continue button. |
On the sensor's details page, click on the Settings tab to change settings.
Note: If not set explicitly in a sensor's settings, it will connect to the IP Address or DNS Name defined in the settings of the parent device the sensor is created on.
Basic Sensor Settings |
|
Sensor Name |
Enter a meaningful name to identify the sensor. The name will be shown by default in the device tree and in all alarms. |
Tags |
Enter one or more tags, separated by space or comma. You can use tags to group sensors and use tag-filtered views later on. Tags are not case sensitive. We recommend using the default value. You can add additional tags to it, if you like. Other tags are automatically inherited from objects further up in the device tree. Those are not visible here. |
Priority |
Select a priority for the sensor. This setting determines where the sensor will be placed in sensor lists. Top priority will be at the top of a list. You can choose from one star (low priority) to five stars (top priority). |
SNMP Library Specific |
|
Selected Interface |
Shows the interface monitored by this sensor. Once a sensor is created this value cannot be changed. It is shown for reference purposes only. If you need to change this, please add the sensor anew. |
Unit String |
Enter a string describing the unit of the returned values. This is for display purposes only. Please enter a string. |
Multiplication |
If you want to multiply the received data with a certain value, enter the quotient here. Please enter an integer or float value, or leave the field empty. |
Division |
If you want to divide the received data by a certain value, enter the divisor here. Please enter an integer or float value, or leave the field empty. |
Sensor Display |
|
Primary Channel |
Select a channel from the list to define it as the primary channel. In the device tree, the last value of the primary channel will always be displayed underneath the sensor's name. The available options depend on what channels are available for this sensor. |
Chart Type |
Define how different channels will be shown for this sensor.
|
Stack Unit |
This setting is only available if stacked graphs are selected above. Choose a unit from the list. All channels with this unit will be stacked on top of each other. By default, you cannot exclude single channels from stacking, if they use the selected unit. However, there is an advanced procedure to do so. |
By default, all following settings are inherited from objects higher in the hierarchy and should be changed there, if necessary. Often, best practice is to change them centrally in the Root group's settings. To change a setting for this object, disable inheritance by clicking on the check mark symbol in front of the respective setting name. You will then see the options described below.
Scanning Interval |
|
Scanning Interval |
The scanning interval determines the time the sensor waits between two scans. Select a scanning interval (seconds, minutes, or hours) from the list. You can change the available intervals in the system administration. |
Schedules and Dependencies |
|
Schedule |
Select a schedule from the list. Schedules can be used to pause monitoring for a certain time span (days, hours) throughout the week. You can create new schedules and edit existing ones in the account settings. Note: Schedules are generally inherited. New schedules will be added to existing ones, so all schedules are active. |
Dependency Type |
Define a dependency type. Dependencies can be used to pause monitoring for an object depending on the status of another. You can choose between:
Note: Testing your dependencies is easy! Simply choose Simulate Error Status from the context menu of an object that other objects depend on. A few seconds later all dependent objects should be paused. |
Dependency |
This field is only visible if the select object option is enabled above. Click on the reading-glass symbol and use the object selector to choose an object on which the current sensor will be dependent on. |
Inherit Access Rights |
|
User Group Access |
Define which user group(s) will have access to the object you're editing. A table with user groups and right is shown; it contains all user groups from your setup. For each user group you can choose from the following access rights:
You can create new user groups in the System Administration—User Groups settings. To automatically set all objects further down in the hierarchy to inherit this object's access rights, set a check mark for the Revert children's access rights to inherited option. |
Knowledge Base: How can I import my MIB files into PRTG?
Click on the Channels tab to change display settings, spike filter, and limits. For detailed information, please see Sensor Channels Settings section.
Click on the Notifications tab to change notification triggers. For detailed information, please see Sensor Notifications Settings section.
For more general information about settings, please see Object Settings section.
For information about sensor settings, please see the following sections:
Keywords: